GESTAG Installation

Installation Process

GESTAG installation is simple and can be carried out by specialized technicians. The process involves:

  1. Site Analysis: Evaluation of the building’s or home’s hydraulic infrastructure
  2. Planning: Definition of sensor installation points
  3. Sensor Installation: Connection to pulse-output meters
  4. System Setup: 3G network configuration and parameters
  5. Testing: Verification of operation and data transmission
  6. Training: Guidance on how to use the system
GESTAG transmitter
GESTAG installation

Installation Requirements

Pulse-output Water Meters

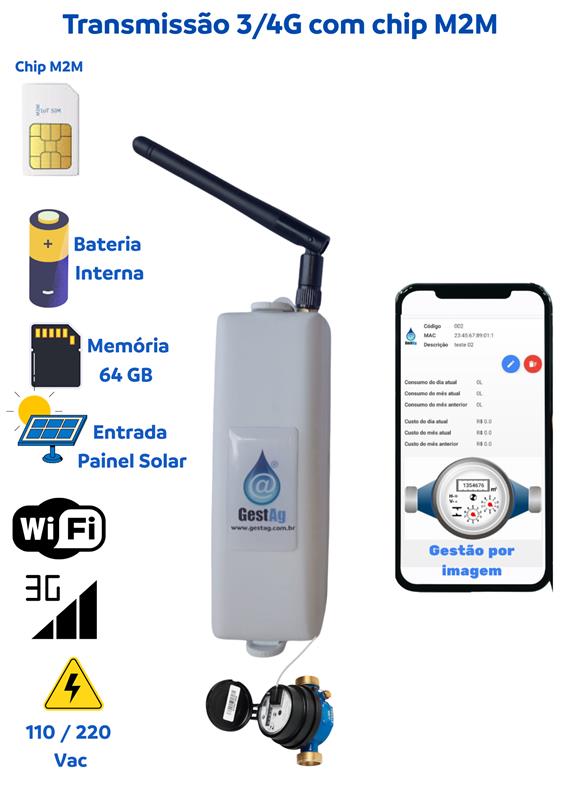
You need water meters with pulse output to connect to GESTAG.

3G Coverage

The site must have 3G network coverage to transmit data.

Electrical Access

A power point close to the installation points.

Installation Types

Installation in Condominiums

For condominiums, GESTAG can be installed in different ways:

  • Series Connection: Connects all meters in a single line
  • Individual Connection: Each apartment has its own sensor
  • Per-floor Connection: Grouping by building floors
Series connection

Series connection

Per-floor installation

Per-floor installation

Installation & Operation

Steps, benefits, and support — with real equipment images.

Gestag installed on a pulse-output meter

Residential Installation

For single homes, installation is simpler:

  • Connects directly to the main meter
  • Monitors total household consumption
  • Detects leaks and waste
Gestag with 3/4G transmission, M2M SIM and viewing app

Installation Benefits

Main practical day-to-day benefits:

  • Real-time monitoring
  • Early leak detection
  • Savings on the water bill
  • Detailed reports
  • Remote control via phone
  • Non-invasive installation
  • 24/7 operation
  • Automatic alerts
  • Consumption history
  • Easier building management
5-step installation infographic

Technical Support

Our technical team provides:

  • Professional installation
  • Training to use the system
  • Specialized technical support
  • Preventive maintenance
  • Software updates

Fiber backhaul for GESTAG

Goal: ensure reliable backhaul between GestAg modules on each floor and the concentrator (router or core switch) using fiber optics — maintaining continuous telemetry, low latency, and an isolated IoT network with security.

Architecture scenarios

1) Ethernet-over-Fiber with Media Converters (simple and modular)

How it works: each GestAg (RJ45 port) connects to an RJ45⇄SFP media converter on the floor; fiber runs up/down to the core switch with SFP/SFP+ slots.

  • Topology: star (recommended) or ring for redundancy.
  • Speed: 1 GbE (SFP) or 10 GbE (SFP+), as needed.
  • When to use: few points per floor, retrofit with narrow conduits, distances up to ~10 km on SM.
  • Pros: simple, modular architecture compatible with any Ethernet GestAg.
  • Cons: each converter requires local power, since PoE does not run over fiber.
2) Edge optical switches with SFP slots (centralized management)

How it works: install an L2 switch on each floor with RJ45 ports and 1–2 SFPs. GestAg units connect over copper, and the switch uplink goes over fiber to the core.

  • Features: VLAN 802.1Q, STP/RSTP, ERPS (G.8032), QoS, port mirroring and SNMP.
  • When to use: many GestAg units per floor, need to segment traffic (IoT VLAN, voice, data).
  • Pros: better manageability and consolidation, fewer standalone converters.
  • Cons: higher cost and complexity; ideal to have UPS on each floor.
3) PON (GPON / XGS-PON) (high point concentration)

How it works: an OLT in the MDF feeds optical splitters in the shaft; on each floor, an ONU delivers RJ45 to local GestAg units.

  • Capacity: GPON ~2.5/1.25 Gbps; XGS-PON 10/10 Gbps, shared bandwidth.
  • When to use: tall buildings with many points and few available conduits.
  • Pros: excellent capillarity and fewer cables back to the OLT.
  • Cons: requires PON engineering (optical budget) and local power for ONUs.
Quick comparison between architectures
Criteria Converter L2 Switch PON
Initial cost low medium high (OLT) / low per ONU
Scalability medium high very high
Manageability low high medium/high
Need for power on the floor yes yes yes
Required ducts 1 fiber per floor 1 fiber per floor (or ring) 1 trunk + splitters

Components and specifications

Cables and fibers
  • Single-mode fiber (SM G.652D / G.657A1/A2): building standard, long reach and good bend performance.
  • Multimode fiber (OM3/OM4): only for short runs (≤ 300 m at 10 Gbps); in buildings, prioritize SM.
  • LSZH jacket: low-smoke, zero-halogen — ideal for indoor environments.
  • Indoor/outdoor builds: tight-buffer or breakout options for semi-exposed segments.
  • Microduct / blown fiber: solution for tight conduits, easing future expansions.
Connectors and terminations
  • LC/UPC: compact connector, standard in SFPs, excellent for building racks.
  • SC/APC: widely used in PON, with low optical reflection.
  • Fusion splicing: preferred method with lowest loss.
  • Mechanical splices: emergency-only alternative.
  • ODF / splice enclosures: use one per floor and a dedicated tray in the core rack.
Transceivers (SFP / SFP+)
  • 1G SM SFP 1310 nm: typical 10–20 km links for Ethernet-over-Fiber.
  • 1G BiDi SFP: allows a single fiber per link (different wavelengths for Tx/Rx).
  • 10G SM SFP+: recommended for aggregation or future growth.
  • PON ONT/ONU: optical modules compatible with GPON/XGS-PON OLT, usually with SC/APC.
Edge equipment
  • RJ45⇄SFP converters: ideal for Ethernet-over-Fiber scenarios with LFP/Link-Fault-Pass-Through.
  • L2 switch with SFP: VLAN 802.1Q, STP/RSTP, ERPS (G.8032), QoS and SNMPv3 support.
  • PON ONU: terminates fiber into RJ45 on each floor and integrates the whole GestAg network.
Power and protection
  • PoE does not run over fiber: converters, switches and ONUs need local power with UPS.
  • Grounding: ODFs, racks and shields must be properly grounded.
  • Physical organization: short patch cords, clear labeling (floor/port/fiber) and bend radius ≥ 10× cable diameter.
Recommended topologies
  • Star with logical redundancy: one fiber (or BiDi) per floor to the core, with LACP or RSTP for high availability.
  • Optical ring across floors (ERPS G.8032): L2 switches with SFPs forming a ring and two nodes in the core; typical recovery times < 50 ms.
  • PON: OLT at the core, splitters in the shaft and ONUs on each floor, with careful optical budget calculation.
L2/L3 layers and security
  • Dedicated IoT VLAN: isolates GestAg traffic and reduces unnecessary broadcast.
  • ACLs and firewall: allow only required MQTT/HTTPS/NTP/DNS to the dashboard.
  • DHCP and IPAM: address control for ONUs, converters and switches.
  • Monitoring: SNMPv3/syslog for optical levels, flaps and SFP temperature.
  • L2 redundancy: STP/RSTP or ERPS in a ring, always with controlled configuration.
  • QoS and NTP: prioritize telemetry and standardize event timestamps.
Bill of Materials (BoM) per floor

Examples of minimal sets for each architecture:

Media Converter Option

  • 1× RJ45⇄SFP converter (1G);
  • 1× 1G SM SFP 1310 nm or 1 BiDi pair;
  • 1× LC–LC patch cord (or SC depending on ODF);
  • 1× shared ODF/termination box;
  • 1× compact UPS (≥ 600 VA) + 12/24 V PSU.

L2 Switch Option

  • 1× compact L2 switch (4–8×RJ45 + 1–2×SFP);
  • 1–2× 1G SM SFPs or BiDi;
  • 1× UPS + dedicated power supply.

PON Option

  • 1× ONU (1–4×RJ45);
  • 1× splitter according to fiber plan;
  • 1× SC/APC patch cord;
  • 1× UPS + local power supply.
Deployment in practical steps
  1. Conduit survey: map shafts, trays and available routes.
  2. Choose architecture: Converter, L2 Switch or PON based on power and number of GestAg per floor.
  3. Optical design: choose fiber type (SM G.657), connectors, ODFs and cable slack.
  4. Pulling and splicing: perform splices, OTDR and power measurements (Rx/Tx within budget).
  5. Rack and ODF setup: label ports, fibers and floors clearly.
  6. L2/L3 configuration: IoT VLAN, DHCP, ACLs, SNMP and redundancy protocols.
  7. Commissioning and handover: ping/loss/jitter tests, read SFP levels (dBm) and deliver the “as built”.

Always record initial optical levels to track possible future degradation (bends, dirty connectors, or breaks).

Fiber architecture video for GESTAG

Use this space for a video showing fiber pulling, ODF termination, connection to GestAg units on each floor, and real-world building installation examples.

GESTAG deployment flow

Smart water monitoring with 3G/M2M communication and web dashboards, organized in a clear deployment flow — from the diagnostic phase to project consolidation.